


CliVE (Clear Internet Vehicle Experiment)
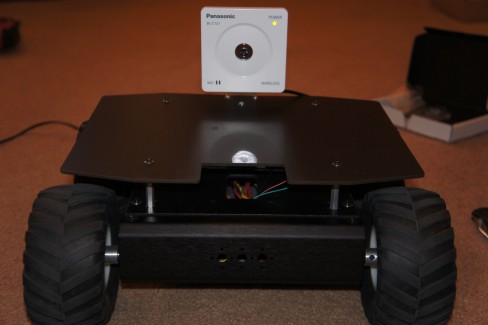
This is my second robot, my first was a I.P. controlled robot for my senior project in Electrical Engineering. This one I am doing for fun. I am trying to incorporate the lessons I learned in creating the first robot into CliVE. The MCU on the robot is an Arduino Mega 2560, with an Ethernet shield for receiving user commands. The robot has a Panasonic IP cam for visuals. The mechanical side is a LynxMotion 4WD chassis. I have batteries and a Sabertooth 2x12 for running the motors, it travels around 4.5 fps at top speed.
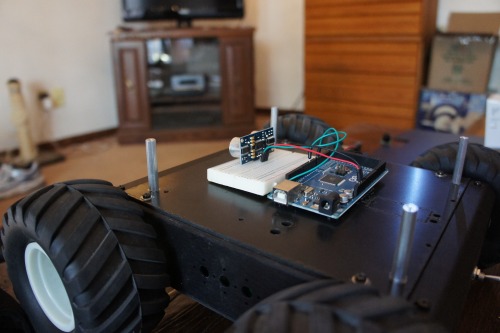
I am currently designing a power supply for the electronics, choice of battery and finalization of the PCB layout are waiting until I figure out how the networking will work. My primary option for networking is a Clear modem/ router combo. My first robot talked to a router and had a range of around 200ft. I'm moving to city with Clear internet soon, and I've been considering strapping a router/modem combo onto CliVE so it will have a range of anywhere Clear has a signal. My biggest concern with this is if Clear will provide sufficient bandwidth so the camera will have a decent frame rate. I've also been playing around with a Ping ultrasonic sensor, so I can implement some limited level of collision avoidance in case the video lags and I'm about to crash into a wall at full speed.
The robot is controlled using a PS3 controller on my PC, through a telnet connection, and a web-browser for the camera. I've coded and tested the control code on the Arduino, but unfortunately the range is limited to the length of my 12 feet of Cat5 cable, it works pretty well though. I've implemented 3 speed settings, Tank turns left and right , and arc turns forward left and right, and back left and right. The arc turning radius is around 4-8 feet depending on the speed setting. I have a list of features about a mile long that I want to implement on this project. I'll update things as I go. I'll probably post power supply schematics and PCB layout when I get them out of Express and into Eagle.
************************* UPDATE November 23, 2011 *************************
I've taken a fair amount of time off from this project. Recently moved 1500 miles, and I'm settling into a new job. As for project updates here goes:
I designed a power supply board for the electronics side of the system. Basically there is a 14.8v rechargable LiPo battery connected to a supply which has 3 LM317 adjustable voltage regulators in parallel. Each of the adjustable regulators are set to a different voltage; 12v for the router, 9v for the webcam, and about 5 or 6v for the arduino. The board is setup so that all 3 voltage regulators are screwed onto the same gigantic heatsink, which I learned was necessary after I burned myself on one of them when I was testing. The parts for the power supply were pretty cheap, maybe $20 on Mouser, the board was $80 for 3 PCBs through ExpressPCB.
For networking I've just taken apart my old netgear router I wasn't using and strapped it on to the robot. I still intend on getting something like a 4g router with a static IP address so I can extend the range, but the setup is nearly identical, except without a static IP and external connection I have to be local to the routers network. I cannabalized the old DC power plug for the router, and connected it to the 12v output on my power supply. The camera is setup to automatically associate with the network for my router, and the arduino's ethernet shield is connected by a 12 in. cat5 cable directly to the router. So once the router powers up I can use the wireless on my laptop to join the routers network. The router portforwards connections from web browsers to the web cam, and it forwards telnet connections to the arduino shield.
Arduino provides sample code to allow you to run a simple telnet connection into the shield, and so you can get text characters as input into the Arduino MCU. I'm using TeraTerm as the program to make a connection, by connecting directly to the routers' IP address at port 20, and having the router automatically forward that connection to the arduino shield (or rather the IP address I statically assigned to the shield). Using text commands in the telnet window I can move the robot where I wish. I setup the program to accept 2 characters at a time, so for example WW corresponds to full forward, AA is a tank turn left and AW or WA corresponds to driving forward while turning left. I also programmed 3 speed settings, but the lowest setting is a bit too slow to work well.
I've installed headlights onto the robot, and mounted the ultrasonic sensor, and they're all wired up but I haven't spent time to code the features in. I'm a bit dissapointed with the way I've setup the robot though. The parts have to be wired up and screwed together in a very specific order, which means making small changes can be very time consuming. The worst part is charging the batteries for the motors requires taking almost the entire robot apart. I've been spending some time thinking about a fix for this problem, but I'm not eager to strip the robot and redesign the layout from the ground up. I'll take the time to charge the batteries and finish the code over this holiday weekend, and hopefully have some more pictures or a video of it in action.
User controlled over the internet
- Control method: Wireless control via telnet connection to an I.P. address
- CPU: Arduino Mega 2560
- Operating system: N/A
- Power source: 2x 6V NiMh in series for the motors.
- Programming language: C++
- Sensors / input devices: Parallax Ping))), Panasonic BL-121
- Target environment: Indoors / Outdoors on dry days