


BenjiBot (4wd Rover platform by DFRobot (New video added)
Updated my story, since it was all a bit long and (to most people, probably) boring.
Update 22-06 below:
This is my first robot, so go easy on me.
I’ve had quite some experience with electronics and have done a lot with RC cars in the past, but there has always been a slumbering desire to get into robotics.
Loads of ideas, shortage in money, I think most people know about that.
So, to make a long story short, I decided to go with the 4wd Arduino platform from DFRobot.
This, along with an URM37 ultrasonic sensor and a 2A motor shield (also both DFRobot products, bought at a local distributor) will be the base of my first robot.
The chassis assembles quite easily, a little bit of soldering required (wires to the motors) and you’ll be done in less than 2 hours for the basic chassis. I had to do a bit of pushing and pulling to get it all lined up nicely but the platform is not shifter or bent.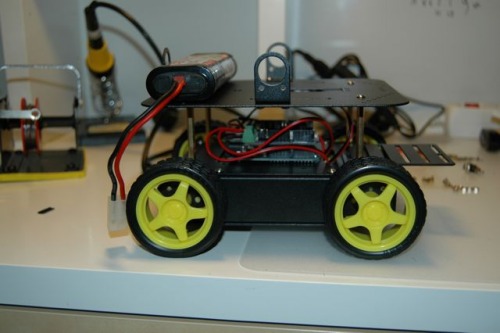
The Arduino fits to it nicely, but I would’ve liked it better if it would mount sideways, instead of front to back as it is now. Sideways would allow for nicer cable management, but it’s nothing a bit of drilling can’t fix, should you want to.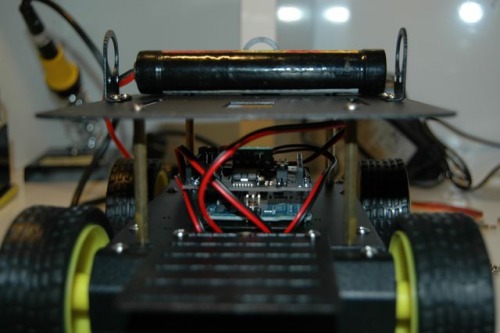
I mounted the URM37 on a bluebird high torque servo. Why a high torque? Because it is the only full size servo I had in the house that I deem reliable enough to put the sensor on, without a high price. Other servo’s I have are either mightily expensive or I have seen them burn out with hardly any load.
To mount the sensor to the servo, I used a servo horn and screwed two of the sensor mounts that come with the kit to it. This is not ideal but will do for now.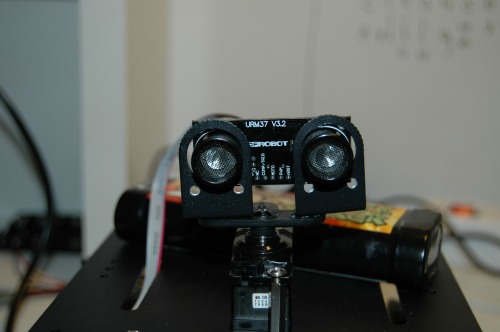
To connect the sensor to the Arduino I made a simple cable with a piece of a female header and a ribbon cable. I only connected pins 1(V+), 2(GND), 7(Enable pin to V+ so always on), 8(TX to Arduino RX) and 9 (RX to Arduino TX), the others are left open.
Everything is connected to a small breadboard with I have put in the front of the chassis, leaning against the front supports, need to add a tie wrap to have it stable because right now it bounces around. I will find a better solution for this as soon as I have the program running smoothly.
For the power supply, I intended to use a 7,2v stick-pack for the motors and a 9v alkaline for the logic, sensor and servo. This kind of failed… kind of meaning epically in this case. The servo wouldn’t rotate completely and when it did, the Arduino would reset itself.
So I dug into my old RC stuff box and found a perfectly good 6v hump-pack (5 cells, 3 down, 2 above) and this runs beautifully.
The battery for the Arduino and connected essentials is located inside the body. The powerplug comes out on the side where I can put the charger in and hook it up to the Arduino easily(ish...).
I need to put a switch in but don't have a good one yet. (The one that came with the chassis kit doesn't fit anymore after my work...)
The base code was done pretty quickly. I am using the Arduino servo library and the URM37 library, so that works pretty easy.
Furthermore the motors are controlled by PWM so that is very easy as well.
All codes individually work smoothly, however, when I combine everything the bot seems to have a mind of its own.
Either it is becoming sentient, or there is something wrong in the code. I guess it’s the second option, the first one would be awesome though!
I've uploaded a first video, just a couple of seconds, showing the failure it is right now, but I actually got it to work a lot better than earlier. I hope to fix most of the code before or during the weekend so I can get to tweaking it.
Corners are not really exact at the moment and the sensor readings aren't what they should be.
Some more pictures: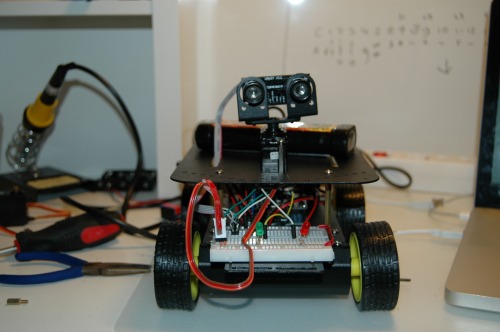
Update June 16th 2011:
Went to work with the code today, changed a couple of small things, and it started responding more as expected.
So, I went on with checking and optimizing, and now it works nearly perfect.
It responds the way it should, I just need to tweak the turning a bit, since it's 90 degrees turn is a bit to large (more like 110 degrees).
You can see in the end of the video that it has 2 flaws in the code I have now, except for the turning:
1: The ultrasounds sensor is up high so it only sees high obstacles.
2: As mentioned before, the sensor isn't mounted that well, so when it bumped into the scratch post of our cat, it came loose.
So, two things to tend too:
1: Getting an additional sensor, probably IR, which will scan objects close to the floor
2: Mounting the URM sensor better.
This will probably take a while because of limited funds, and I don't have an IR sensor or a sensor mount.
The mount I could make myself, so that will come first, after I will get an IR sensor.
Update 19-06:
Today was a hot day. A melt day. A soldering day.
What did I do?
1: I connected a very cool on/off switch to the robot. Why is it cool? It has an LED in it! So yes, that makes it cool.
Nearly shorted the whole thing out, because I connected the ground and V+ the wrong way around. STUPID! Luckily all that burned was a wire, and wires are cheap.
It works now, pictures will follow later.
2: I replaced the breadboard with a perfboard circuit, which makes the whole thing smaller and more tidy. I added some connectors for later upgrades, all 3 pin connectors, so I need to choose my sensors wisely :)
I also made new connector wire for the ultrasonic sensor, the first one was a bit fail, so a new one was due.
It all looks a bit more organized now.
Next step will be debugging the current code, so that the turns are 90 degrees when I want them to be 90 degrees, 45 when I want 45, and so on.
That will take me a bit.
Step after that, making mounts for the ultrasonic sensor (or ordering one from DFRobot, but then I should order more stuff since it would a waste not too :)
Also, I need to fix up something nice to hold the battery pack, right now it just lays there, hoping not to fall off. Already thinking on how to fix something nice and cheap up.
Update 22-06:
Sorry, no foto's or video's yet, I will do that tomorrow or during the weekend.
What did I do?
I changed the code a lot.
Before it would stop when an obstacle was 30 centimeters in front of it, do a sweep for readings and as soon as it found an angle that had more room than 30cm it would go that way.
I changed it so it does a full sweep of the room and picks the angle with the largest open space.
Then I worked on getting the steering better.
If it had to make a 90 degree turn, it would do something like 110/120, which is too much. So I played around with the code and got it a little better. However, it turns to the right faster than to the left, so I still have to tweak it. My best bet is getting rotary encoders, so I need to find some budget for them. They are only like €10 and those fit to this model perfectly, so not too much luckily.
I had it do a testrun and it ran beautifully! Excellent, with the quirks noted above.
In the end it had made so many turns that one of the wheels came off. They are not stuck to the motor shafts in any way, and when turning a lot (I make it turn in it's place), the wheels appear to come loose completely.
This may explain the tendency to lean to the right while driving a bit.
It's getting there!
Code is about as good as it is going to get, navigation wise. I need to get the debugging LED's working, which will be a small thing (and small things take the most time, as everybody will probably know :) ).
After that I have some crafting to do which will take me quite a while.
Update 23-06:
New video uploaded, it first gives a short overview of the bot. I deleted the sound because it sucked (barking dog and such).
Did a great run today, it roamed around for about 10 minutes and it got stuck twice. Not bad for only one sensor I think :)
It will get better when there is one or two more sensors hooked up.
I'll upload some pictures today or tomorrow
Let me know what you think!
Navigate around with ultrasound
- Actuators / output devices: 1:120 DFrobot geared motor
- Control method: autonomous
- CPU: arduino uno
- Operating system: Arduino
- Power source: 7.2v for motors/6v for Arduino
- Programming language: Arduin C
- Sensors / input devices: URM37 ultrasonic
- Target environment: indoor