


Beer/Soda serving Lego/Arduino Robot
16 September 2013
I finally got time to continue with this robot! This time the challenge was to grab multiple cans/bottles from the fridge. This means that the robot has to store the cans or bottles somewhere, to get its arm free to get the next can. I first came up with an extra robotic arm on top of the robot that grabs the can from the arm that reaches into the fridge. This second arm could place the cans behind the robot. But I found out that the cans are quite heavy and I would have to use a big ass crane to be able to move the cans, which would add too much weight on the robot. So I thought about an extra arm below the first arm that reaches into the fridge.But I found out that also in this way the cans were too heavy, making the pneumatic cilinders extract on high velocity which resulted in less air pressure in the grabbing mechanism which let loose of the can. So I needed to come up with something else. And then I came up with a slide, see video!
In theory it can now bring me drinks from the fridge. Now I have to write an Android app in which I select which drinks and how many. I've never programmed an app before so it'll take some time. In the mean time I'll be working on something else very cool that I'll post here once finished.
30 July 2013
I finally got the fridge door opening procedure working, see video. First it opens the fridge door just a little bit by using the pneumatic system. After that, sometimes the robot positioned itself just right to enter the fingers of the cangrabber in the aperture of the fridge door, but not always. So I installed an ultra sonic distance sensor on the can grabber. The grabber will search for the end of the door and then it goes back a bit to position the fingers just right in front of the aperture. After that it uses some smart movements to open the door.
Unfortunately the robot has become too heavy to use the wheels to make the robot move sideward. That way could have some extra reach and thus extra space to put cans in the fridge: the robot can now only reach the right half of the fridge. But that's enough I guess. Enjoy the video!
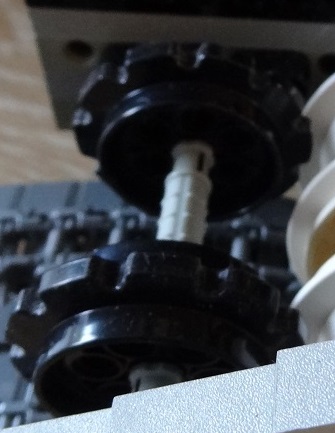
15 July 2013
A photo of the sprockets, especially for ArtiInventor ;)
10 July 2013
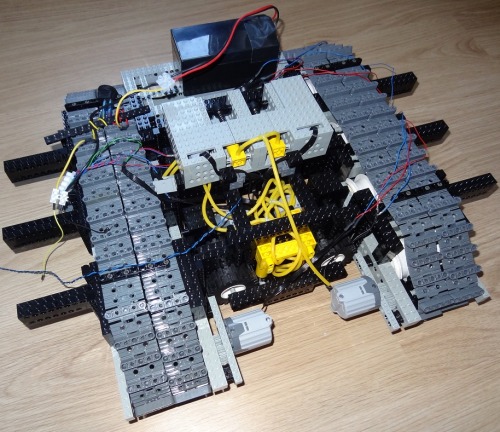
The first obstacle that I literally had to take was a bump between the kitchen floor and the living room floor. I tested the frame of the robot with two 4kg dumbells on top of it to get over the bump (see video 1). The expectation was that the robot would have a final weight of about 10kg. Now that the robot is mechanically almost complete; the weight has reached up to 15kg and the obvious occured: the robot wasn't able to get over the bump once again! Fortunately I had a simple way to fix it: the motors were running on 9V that came from a 7809 regulator. I adjusted the PCB and connected the motors to the 12V of the battery output. And once again the robot is able to take the bump! The motors are officially rated for 9V so I have to see how long the motors will keep up. The pieces of the trajectory where there's no bump, the motors will be powered at a lower rate (12V 80% PWM signal). See video to the right ;)
Now I can think of how to open the fridge again. The robot had also problems with turning so I had to solve this first...
2 July 2013
Found the problem: a heatsink was touching a 5V pad of a resistor. It was a design flaw in the PCB that I already knew about but forgotten about...
 1 July 2013
I got a problem with the electronics: somehow the 5V rail short ciruicts with the GND. I didn't do anything with it, except for dropping a USB programming cable on the circuit board. Well, I guess I have some searching to do in an electronic jungle...
26 June 2013
I got the pneumatics of the robot working! The pneumatic valves are motor (powered by L293 chips) controlled, so I can control them from the Arduino. One set of claws grabs the fridge door handle to open the fridge, the other set of claws is used for picking a can out of the fridge. Next step is to get the NXT motors working so I can actually open the fridge! See video 4 for the explanation and to see the pneumatics in action.
14 May 2013
I've added four ultrasonic distance sensors, SRF04, that measure the distance to the walls of my home. Next to that I've added a digital compass HMC6352. This compass makes sure that the robot turns the right amount of degrees. I've programmed it to go to the fridge, with its "claws" around the handle of the door. It cannot open the fridge door yet, that's the next challenge! After that it rides successfully to the couch; see newly added video!
The robot weighs already around 10kg, I hope it will not become too heavy to be able to take the bump in the floor (see first video).
25 April 2013
Since some annoyed comments on the "mystery part" ;) : Duane was right: it's gonna be a robot that fetches me a cold drink from the fridge :D I'll keep it a secret on youtube though, gives me some views extra maybe ;)
I need the robot to move sidewards aswell (to be able to open the fridge door) and that's a problem with caterpillar tracks. So I came up with a pneumatic system of 8 wheels that come down using a (for Lego terms) big ass compressor. All lego ofcourse! It works perfectly and the system can lift at least 15kg! I'll connect the Arduino and the Multipurpose PCB (voltage regulators, motor controllers, amplifiers for distance measurements and so on) later on, then I'll program it to make a demonstration and make a video of it...
18 April 2013
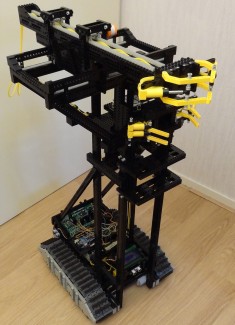
A new Robot! But what does it? At least 1 meter tall and about 7 kgs in weight... Along the building process you'll find out what this robot will do! If you have any thoughts about it: shout it out! The main photo shows an earlier version. See the first Youtube video for the version that I'm working on right now. I'll keep you informed about the progress and you'll discover bit by bit what this robot's task will be...
Serve me a beer from the fridge, all autonomous
- Actuators / output devices: About 15 motors, compressor
- Control method: automatic
- CPU: ATmega 1280
- Power source: 12V lead acid battery
- Programming language: C/Arduino
- Sensors / input devices: bumper switches, Bluetooth, temperature, distance, colour
- Target environment: indoor