


ASURO - my next 3 robot kits
Hi guys,
today I present you my next 3 robot kits.
They are based on ASURO robot kit:
http://www.arexx.nl/arexx.php?cmd=goto&cparam=p_asuro
Following the official description.
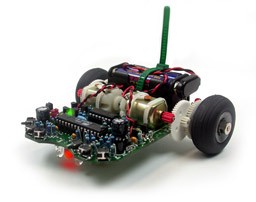
“ASURO is a tiny mobile robot developed for educational purposes by DLR, the german aerospace centre.
It is very flexible and completely programmable in C. Assembly is easy for experienced electronic technicians and feasible for a novice. Except for the printed circuit boards (PCB) only standard parts are utilized and freeware tools can be used for programming. Therefore ASURO is exceptionally suitable as an introduction into processor-controlled hobby electronics, for projects in schools and universities, for studies and adult education centres. Special tools, which are freeware for private users, have been used for all electronic development phases and software design, proving that robots can be designed without expensive tools or machines.
ASURO is equipped with an Atmel AVR RISC-processor and two independently controlled motors, an optical linetracer, six collision-detector switches, two odometer-sensors, three indicator LEDs and an IR-Interface for programming and remote controlling by a PC.”
In the link above you can find the whole instruction manual incl. schematics, parts list, assembly etc. in English. Or alternatively there is a great Wiki in German (www.asurowiki.de).
Why 3 of them?
Well, I wanted one preferably used due to the fact that I wasn’t keen on soldering to that time and I found some on ebay. There you never know whether you get it, so I bid to 5 pieces and I get 3 for very low price. Two of them was described as broken. And in deed there were only mistakes made by soldering as I found out. I repaired them and started to experiment. The idea was also to have somehow a robot swarm. And as you can see above, there are ways how the tiny things can communicate together.
Robot No. 1. – line follower:
After repair it is more or less the standard build like described in the manual. So I donate him new batteries and found out that he was programmed as line follower.
Robot No.2. – light seeker:
Also this one I could repair simply by checking the el. scheme and the robot itself. One resistor was broken. I replaced it and it works now. On this one I wanted to test a new purchase of the accessories UBS IR transceiver. The original RS232 IR transceiver included in the kit is hard to operate due to its sensitivity. I wrote a simple program “light seeker” which is more or less the inverse function of line follower.
Robot No.3. – angry asuro:
Now with having a very little experience in building or better say repair and programming of robot kits I hacked this one. I removed the line following function which consist of one red diode and two photo transistors. Then I had some free in/out and with it access to the processor. I wanted him to see things. As a simple example I wanted to use the ultrasonic HCSR04 sensor. This one is cheap and works pretty well. There is an expansion board available, but I wanted to do something by myself. And I didn’t find anyone who made it before. I started to study the processor in detail. Finally I set up the pins in the right way. Due to the fact that Asuro has only 3 timers which are needed for several of its functions, I could not use them. I tried lot of ways, but I won’t work. And then of course the simplest is always the best. Given the fact that the frequency with which the robot works doesn’t change that much I just used the speed of calculating of the processor without any measurement of time. How can I know that it works? Just by measuring the real output and calibrating the results. Using this unprecise way you can you are dependent on how complicated is the program, how much power your batteries have, what is the robot actually doing etc. But it is precise enough to avoid obstacles. So I wrote a simple program to avoid obstacles by using the sensor I mentioned and a second one for hunting my children named “angry Asuro”. The robot just turns around and once something is near enough to the sensor it starts to move forwards at maximum speed. That’s it, nothing special, but funny for the children.
See you in the next post.
Navigate around via ultrasound, line follower, light seeker
- Actuators / output devices: 2 geared motors
- Control method: Full autonomous
- CPU: atMega8
- Power source: 4 AA batteries
- Programming language: C++
- Sensors / input devices: IR, motor encoders, ultrasonic, bumper switches
- Target environment: indoor