


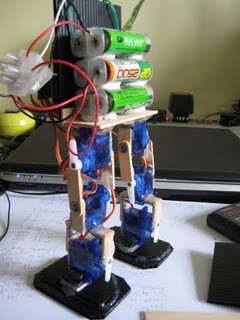
Arduino Robot - Biped
This bipedal robot is built as cheaply as possible. Hence there are no sensors, fancy servos or brackets.
Height of robot: 20cm
Weight of frame: 150g
Weight of batteries: 210g
Microcontroller: Arduino Duemilanove
Power supply: 6xAA batteries (7.8V)
Servos: 6x r/c micro servos (HXT900)
Main Building Materials: ice-cream sticks, brass eyelets, hot glue, corrugated plastic board.
Brief Description:
Basically the ice-cream sticks are used to replace normal servo brackets and hot glue is used instead of screws. Lots of hot glue.
Drill a hole at the end of two ice-cream sticks and connect them with the brass eyelet.. and you got yourself a simple hinge!
You need to calibrate each servo horn angle before tightening its screw to the servo. In other words, when at zero angle, the left and right servos should match up about the same. Best way to do this is through stubborn trial and error!
I used HXT900 servos because of their price and reliability. One tip is to remove the labels before applying hot glue as labels generally lose their stickiness overtime. It sucks when the robot comes apart not because of glue or parts failure but stickers peeling off! Also, apply the hot glue generously and always reinforce the sides! But make sure there is proper ventilation in the room if not you will bound to get a headache.
As you can see, the batteries make up about 60% of the total weight. Im thinking of switching to those lithium batteries as they have better power to weight density.. and i might even be able to add a few more servos and reduce the jerkiness of the way the bot walks.
So please email me at [email protected] and support this site! Check back at http://retardokiddo.blogspot.com/ regularly for new updates!
walk
- Actuators / output devices: Servos
- Control method: none
- CPU: arduino duemilanovue
- Power source: 6x AAcells = 7.8V
- Sensors / input devices: none
- Target environment: Indoors is best