


Arduino Quadruped Robot - Stalker
Quadruped Robot using Arduino - Stalker
Hi, I am back! It's been 8 months since I last touched a robot! I am going to build an Arduino Quadruped Robot. Sorry if you have seen enough and are really fed up with Quadruped robots, but that is what I am going to do this time... :-(
This robot is actually the first robot I wanted to build, but I failed miserably. you can check this out
After building a working Arduino Arduino Hexapod robot, I feel confident that I can pull it off this time! I recycled the parts from the hexapod robot, and build a body with styrene sheets, so there is no new parts.
Again, I will share my source codes and show as many pictures as possible, to help those of you who are doing similar projects. The way I do thing might not be the best way, and I am sure you can come up with better solutions, please let me know! :-)
I call this robot stalker, because of the game unit in Star Craft with the same name. (although they look totally different :p)
============================================================
Update
31/03/2013
Basically copied most of the codes from my last Hexapod robot. All I did was to remove the variables related to the middle legs, and modifed the preset variable values to work in the Quadruped Robot, and it actually worked! :)
But the movements are quite Awkward, a lot of work need to be done about Inverse Kinamatics.
Here is how I made the body:
I have also added a Excel Spreadsheet simulation to this project. it's available to download on my blog. (link in video description)
It simulates the movements of a quadruped robot. it shows detailed inverse kinematics calculations, and it might help those who are having problem understanding IK to visualize the complex computations.
============================================================
Creeping Gait - Update
15/04/2013
I have been travelling a lot and the train Journeys are giving me a headache!
Tonight I came up with a 20-step Creeping Gait. This gait is how 4 legged animals, for example cats, walk.
This is the GaitStep Plan (leg one is the top right leg, leg two is the bottom right leg... etc...)
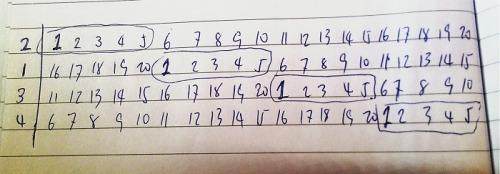
Circled steps are the leg-lifting steps, and the gait cycle starts at step one where leg starts to be lifted.
I copied most of the code on how to generate gait sequence from my previous hexapod robot, you can check out the source code. Here is the source code for the gait I have written:
Before we start, we call this function to initialize the variables for the Gait:
void GaitSelect (){

	//begining of the step cycle for each leg (with reference to the first leg)
	GaitLegNr[LR] = 1;
	GaitLegNr[LF] = 6;
	GaitLegNr[RR] = 11;
	GaitLegNr[RF] = 16;

	NrLiftedPos = 5;  // number of steps that the leg is in the air
	TLDivFactor = 15; // number of steps that the leg is on the ground
	StepsInGait = 20; // total steps
}
For a complete Gait cycle (e.g. from step 1 to step 20), we will go through loop() function 20 times, each time we call GaitCalculate(), and then increment 'GaitStep' variable.
coor GaitCalculate (){
	//Calculate Gait positions

	for (int LegIndex = 0; LegIndex < 4; LegIndex++){

		if (GaitStep == GaitLegNr[LegIndex]) {
			GaitPos[LegIndex].Y = -LegLiftHeight/2;
		}
		else if (GaitStep == GaitLegNr[LegIndex]+1) {
			GaitPos[LegIndex].Z = 0;
			GaitPos[LegIndex].Y = -LegLiftHeight;
		}
		else if (GaitStep == GaitLegNr[LegIndex]+2) {
			GaitPos[LegIndex].Z = WalkLength/2;
			GaitPos[LegIndex].Y = -LegLiftHeight/2;
		}
		else if (GaitStep == GaitLegNr[LegIndex]+3) {
			GaitPos[LegIndex].Y = 0;
		}
		else{
		// move body forward
			GaitPos[LegIndex].Z -= WalkLength/TLDivFactor;

		}

	}

	//Advance to the next step
	if (++GaitStep > StepsInGait)
		GaitStep = 1;


}
This is by no mean the best implementation, but it might give you an idea how to start doing gaits if you still have no clue.
I will keep working on Gait, make it more stable, faster, smoother and maybe come up with some more gait style as well, before I publish my full working code.
============================================================
Trot Gait - Update 28/04/2013
Right, finally have the time to do some robotics, and this time I made a fist version of Trot Gait for the stalker.
I didn't look into too much theory stuff to get this gait working, as it pretty straight forward: 2 diagonal legs (1 and 3) lifted and move forward, the other two legs (2 and 4) at the same time move backward, 1 and 3 land. Now 2 and 4 are lifted to move forward while 1 and 3 move backward ... And repeat....
Check out my Gait Study post for more detail:
http://blog.oscarliang.net/quadruped-robot-gait-study/
Robot
- CPU: Arduino
- Programming language: C++
- Target environment: indoor