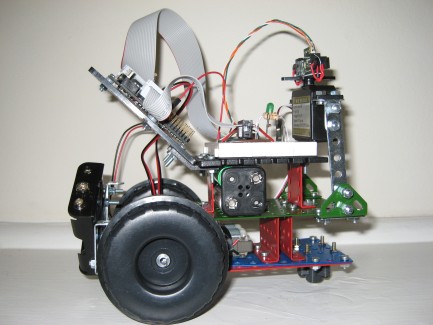
Antares Rover
Started out building a basic rover that uses IR for navigation. It's been a long wait, waiting for various parts, reading up on connectors, components, basics, but finally have it ready. I'll post a video sometime later, for now only pictures. The rover is mostly metal construction and very sturdy yet reusable. I can take it apart and build a different configuration
Before starting out, I set a few objectives for building Antares.
- A reusable hardware platform. That means minimize gluing, taping, no permanent fixtures, no drilling. I used a construction set to build the frame. As you can see everything is screwed on, not taped. The only exception is the breadboard since it came with a sticky bottom and no holes to use screw
- Using standard connectors for electronic components, minimize or eliminate soldering. Initial objective was to eliminate soldering since I've never soldered before. But there are some areas you have to solder like the motor terminal and wires. I used soldering to a minimum. Most connections are reusable. One area where I could've used a connector but ended up soldering was the IR. I didn't get the connector, and didn't wait for one and pay extra shipping so soldered it. The connector is a Japanese standard, so not very easily available
- Picaxe allows for two power sources. My platform has provisions for that. There are two battery holders
- Easy access. Since this is supposed to be a work-in-progress rover, I wanted easy access to both the PCB and the breadboard, that meant I can't stack these two on top of each other(as seen on standard robot kits). That would make chaning connections extremely hard once configured. That's why they have the 'L' shape and kept on top
- Sturdy construction. The rover must survive a few crashes without destroying electronics! Well so far it's been doing great!
- Those pesky details. If you look closely, you'll see I've used plastic standoff's between the pcb and the plate, strain relief where the wires run from the motor, insulated bolts close to the battery terminal just in case! Don't want to short anything!
The rover works great even without the servo hookup. I'll post a video soon. Here are some more pictures.

UPDATES:
Update on the Antares. Reconfigured the sensor and the servo so that it is at a lower height. This was a good suggestion Fritz! Also was a test as to how easily I could make hardware modifications.
Changed the battery to a slimmer profile which now acts as a shield/bumper protecting the PCB and the breadboard. The battery also has a motor kill switch which is very handy. Antares is powered by two sets of batteries, one for the motor and servos and other for the processor.
Worked on the obstacle sensing logic so that it turns only as much as the obstacle and continues on. Some more pictures and an amateur video.
http://picasaweb.google.com/fployd/AntaresRover/photo?authkey=pm8LrZSx3VU#5225086982782402706
Object Avoidance Navigation
- Actuators / output devices: servo, Twin motor
- Control method: autonomous
- CPU: Picaxe 28X
- Programming language: Basic
- Sensors / input devices: IR
- Target environment: indoor


