RC Speed Controller (ESC) Arduino Library | RobotShop Community

hello dialfonzo;
first of all i am sorry for late reply because i was travel past few days …
about the conreoller they called it BLDC controller( i dont know what is the different between BLDC and ESC ) but what i am sure of it that the motor of hoverboard is a brushless motor, i have successful control it with another type of controller using the same code for driving servo motor …
i tried another way by usng PWM signal its start run with variables speeds as i change the Value of PWM but the problem its not smooth turning and unstable …

i.e. for just once i successed to make it run with servo library when i changed some values inside the library file … but i do not remember the values since i was do many testes

An ESC is usually a controller made for the Radio Control (RC) and take a very specific signal. (Electronic Speed Controller)
It’s a PWM but the length of the pulse is the signal.

An ESC can be either Brushed or Brushless but always use RC standard as the input.

Your BLDC is a Brushless DC controller and might take something else as an input like an analog signal (potentiometer).

thank you very much dialfonzo :relaxed:

@dialfonzo Looks like this would help control my hobbyking 80A SBEC using an Adafruit Trinket M0

I’m getting an error on compile – running the ESC on pin 0 and led on pin 1. Is this compatible with 32bit samd arduino?

WARNING: library RC_ESC-1.1.0 claims to run on (avr) architecture(s) and may be incompatible with your current board which runs on (samd) architecture(s).
Sketch uses 11036 bytes (4%) of program storage space. Maximum is 262144 bytes.
Atmel SMART device 0x1001000a found
Device : ATSAMD21E18A

1 Like

Hey @Christopher72!

Welcome to the RobotShop community!

I tried a compilation using Arduino IDE 1.8.10 with the latest RC_ESC library, version 1.1. I targeted the Arduino M0 board (since I don’t have the Adafruit files required to target the Trinket M0) and I did get the same warning.

Please note this is not an error but simply a warning. This is to inform you that the library does not officially (at least right now) state support for anything other than AVR architectures (which a Cortex-M0 is not). That being said, the only dependency of the RC_ESC library (currently) is the Arduino Servo library which itself supports the following architectures: avr, megaavr, sam, samd, nrf52, stm32f4, mbed. Therefore, this indicates that RC_ESC should work on all of these platforms without issue (warning or not).

So, please let us know if it runs well on your board (samd architecture) and we’ll tentatively add this to the supported architecture list (therefore removing the warning).

Sincerely,

1 Like

Hello,
Firstly thanks for this excellent library.
I am using this library to start automatically when ESC and Arduino is powered together (after a switch) … the motor starts, i hold the speed in 2000 and its works fine with the below code:

#include <ESC.h>

#define MOTOR_PWR (4)

ESC myESC (3, 1000, 2000, 1000);         // ESC_Name (PIN, Minimum Value, Maximum Value, Arm Value)

int val = 1000;                                // variable to read the value from the analog pin
int atraso = 0;
int MP;
int low = 0;
int oESC = 1000;

void setup() {
Serial.begin(9600);
pinMode(MOTOR_PWR, INPUT);
myESC.arm();
}

void loop() {
MP = 0;
Serial.print("Start Motor");
  for (oESC = 1000; oESC <= 2000; oESC += 1) {  // goes from 1000 microseconds to 2000 microseconds
      myESC.speed(oESC);                                    // tell ESC to go to the oESC speed value
    
    delay(10);                                            // waits 10ms for the ESC to reach speed
  }
  while (MP == 0){
    oESC = 2000;
    Serial.print("WHILE HIGH-----------------------");
    myESC.speed(oESC);
    delay(10);
  }

  delay(15);                            // Wait for a while
}

But i need use a input pin (button) to reduce the speed and its is pushed. How can i coding it? I tried the code below but it s not works…

#include <ESC.h>

#define MOTOR_PWR (4)
#define B1 (5)

ESC myESC (3, 1000, 2000, 1000); // ESC_Name (PIN, Minimum Value, Maximum Value, Arm Value)

int val = 1000; // variable to read the value from the analog pin
int atraso = 0;
int MP;
int low = 0;
int oESC = 1000;

void setup() {
Serial.begin(9600);
pinMode(MOTOR_PWR, INPUT);
pinMode(B1, INPUT);
myESC.arm();
}

void loop() {
MP = digitalRead(B1);
Serial.print(“Start Motor”);
for (oESC = 1000; oESC <= 2000; oESC += 1) { // goes from 1000 microseconds to 2000 microseconds
myESC.speed(oESC); // tell ESC to go to the oESC speed value

delay(10);                                            // waits 10ms for the ESC to reach speed
}
while (MP == HIGH){
MP = digitalRead(B1);
oESC = 1800;
Serial.print(“WHILE HIGH-----------------------”);
myESC.speed(oESC);
delay(10);
}
while (MP == LOW){
MP = digitalRead(B1);
oESC = 2000;
Serial.print(“WHILE LOW-----------------------”);
myESC.speed(oESC);
delay(10);
}

THANKS

Hey @Vitor_Tavares_Rio_Brasil! Welcome to the RobotShop community!

I’ve edited your post to include code boxes (ex: [ code ] and [ /code ] ) to make the post easier to read. In the future, I highly recommend you either use code tags (for short code examples, such as 5-10 lines) or attach files for larger examples (such as the ones you posted).

Concerning your question, there seems to be code in the loop function (both examples) that seems to include a for-loop that will take at least 10000 ms (or ~10s). That would definitely make using the button pretty difficult.

Also, both while cases may cause you problems since you would read the first state about 10 seconds before it is processed by the while loops. Also, your readings do not include any debouncing (hopefully you added some electrically in your circuit for that switch/button). Here are some basic details about debouncing digital inputs.

You should probably move the “start motor” section with the for-loop to the setup function unless you meant to have it run every time there is a state change in the button.

I recommend that you check online for some tutorials on debouncing digital inputs and basic state machine / main loop programming techniques to help get you started with this kind of stuff. You can find many examples of such discussions online such as (in no particular order):

Sincerely,

hey! @dialfonzo i have read you article. So glad someone can finally help me out
I am making an ESC of my own we have been using Mosfets,created our power supply and driver circuits using opto couplers, and using H-brigde for switching the mosfets in perfect order to run the motor
everything is going fine except the programming part. I have been doing it for quite long. I have tried many combinations but the motor is not rotating. It gives a beep. once it moved for 7 turns. but it didnt completed the whole 12 turns.
We are using a BLDC motor of rating
Model: A2212/6T
RPM/V: 2200 kV
Current: 12 A/60 s
The arduino code is as follows please guide me what am I doing wrong

 int a=1000;
int pin1=3;
int pin2=5;
int pin3=6;
int pin4=9;
int pin5=10;
int pin6=11;
void setup() {
  // put your setup code here, to run once:
Serial.begin(9600);
  pinMode(pin1,OUTPUT);
  pinMode(pin2,OUTPUT);
  pinMode(pin3,OUTPUT);
  pinMode(pin4,OUTPUT);
  pinMode(pin5,OUTPUT);
  pinMode(pin6,OUTPUT);
}
void loop() { 
  // put your main code here, to run repeatedly:
///////////////////////////a-1-6///////////
Serial.println("1-6");
      analogWrite(pin1, 127);
      digitalWrite(pin2,LOW);
      digitalWrite(pin3,LOW);
      digitalWrite(pin4,LOW);
      digitalWrite(pin5,LOW);
      analogWrite(pin6, 127);
delay(a);
  ////////////   b- 1-4/////////////    
Serial.println("1-4");   
      analogWrite(pin1, 127);
      digitalWrite(pin2,LOW);
      digitalWrite(pin3,LOW);
      analogWrite(pin4, 127);
      digitalWrite(pin5,LOW);
      digitalWrite(pin6,LOW);
delay(a);
///////////e- 5-2//////////////////////////
Serial.println("5-2");
      digitalWrite(pin1,LOW);
      analogWrite(pin2, 127);
      digitalWrite(pin3,LOW);
      digitalWrite(pin4,LOW);
      analogWrite(pin5, 127);
      digitalWrite(pin6,LOW);
delay(a);
////////////////d- 3-6////////////////////
Serial.println("3-6");
      digitalWrite(pin1,LOW);
      digitalWrite(pin2,LOW);
      analogWrite(pin3, 127);
      digitalWrite(pin4,LOW);
      digitalWrite(pin5,LOW);
      analogWrite(pin6, 127);
delay(a);
//////////////////f- 5-4////////////////////
Serial.println("5-4");
      digitalWrite(pin1,LOW);
      digitalWrite(pin2,LOW);
      digitalWrite(pin3,LOW);
      analogWrite(pin4, 127);
      analogWrite(pin5,127);
      digitalWrite(pin6,LOW);
delay(5);
/////////////////////c- 3-2/////////////////////
Serial.println("3-2");
      digitalWrite(pin1,LOW);
      analogWrite(pin2, 127);
      analogWrite(pin3, 127);
      digitalWrite(pin4,LOW);
      digitalWrite(pin5,LOW);
      digitalWrite(pin6,LOW);
delay(a);
}

You are trying to build your own ESC code which is not a small task.
What i would suggest is to look at some open-source code for ESC’s and learn out of it.

Hey! @dialfonzo, first of all thank you for the ESC lib and articles.

I am trying to use an arduino to control a TrackStar 120A ESC, which will be used in a car brushless motor. I have tried many different things to arm or calibrate the ESC, but without success. I found your library and tried the same with it. Tried the calibration .ino file, and tried many arm values (500 to 1000), but sound or led appeard in the ESC. I tried the ramp, no success also.

I already used this ESC a couple days ago with an arduino, and it was working. It stopped and now I can’t arm or calibrate it. Sometimes I see 4 red light flashes, 6 or 7 seconds after turning the ESC on.
I’m starting to think this ESC might have some problem, but wanted to know your opinion or hear any suggestions.

Thank you!

Hi AlexVR,

This library take advantage of the Arduino Servo library.
One can achieve the same result directly with the mentioned library alone.

If you got it working with a specific code, it should still be working.
One thing to look into is battery as most ESC will have a battery saving mode for LiPo and will not operate under a certain voltage.

Hope this help :slight_smile:

Hello,

Looking for some advice on running more than ESC at once. For my application I wish to speed control 4 ESCs/Motors from a single potentiometer. They are they same make ESC, so the programming/arming will be the same for all 4. I have successfully written code for a single ESC

#include "ESC.h"
#define LED_PIN (13)                    // Pin for the LED 
#define POT_PIN (A0)                    // Analog pin used to connect the potentiometer

ESC myESC (9, 1000, 2000, 500);         // ESC_Name (PIN, Minimum Value, Maximum Value, Arm Value)

int val;                                // variable to read the value from the analog pin

void setup() {
  pinMode(LED_PIN, OUTPUT);             // LED Visual Output
  myESC.arm();                          // Send the Arm value
  digitalWrite(LED_PIN, HIGH);          // LED High Once Armed
  Serial.begin(9600);                   // Start Serial Monitor
  delay(5000);                          // Wait for a while
}

void loop() {
  val = analogRead(POT_PIN);            // reads the value of the potentiometer (value between 0 and 1023)
  val = map(val, 0, 1023, 1000, 2000);  // scale it to use it with the ESC (value between 1000 and 2000)
  myESC.speed(val);                     // sets the ESC speed according to the scaled value
  Serial.println(val);                  // Print esc value
  Serial.println(analogRead(POT_PIN));  // Print pot value
  delay(15);                            // Wait for a while
}

Please can you help with some sample code or advice on how to control the 4 ESCs
Very much appreciate your help.
Regards Simon

Hi Simon,

If you are using the same potentiometer to control all of them, you would have to send the same signal to all of them.
Just connect the GND and SIGNAL all together and wire them to Pin 9 (as per example) to control them all at once.

NOTE: Do not connect the center 5V wire together otherwise you will burn their internal voltage regulator.

All the best,

Thank you for the speedy reply :slight_smile:

I had considered that but as the 4 motor are not equally spaced i.e. they have different length cables running from the Arduino to the ESCs I wondered if that would be ok. I am only talking 2 ESCs at 300mm and the other 2 at 800mm.

If I wanted to control the motors independently, is that possible?
Regards Simon

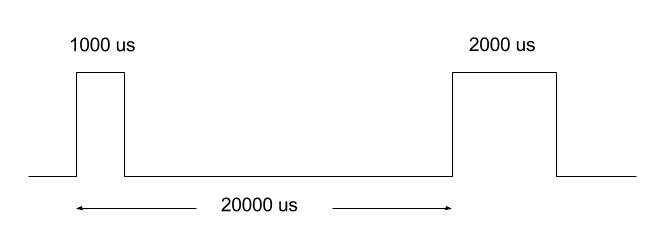
The signal sent from the Arduino to the ESC is a PWM or Pulse Width Modulation type.
It will change the HIGH time going from 0v to 5V so the cable length is not important. (unless you are making it WAY too long and loose voltage over it)

image

If you want to control them individually and use the library, just create multiple ESC on different PWM capable pins.

I haven’t tested but something like that:

#include "ESC.h"
#define LED_PIN (13)                    // Pin for the LED 
#define POT_PIN (A0)                    // Analog pin used to connect the potentiometer

ESC myESC1 (3, 1000, 2000, 500);         // ESC_Name (PIN, Minimum Value, Maximum Value, Arm Value)
ESC myESC2 (5, 1000, 2000, 500); 
ESC myESC3 (6, 1000, 2000, 500); 
ESC myESC4 (9, 1000, 2000, 500); 

int val;                                // variable to read the value from the analog pin

void setup() {
  pinMode(LED_PIN, OUTPUT);             // LED Visual Output
  myESC1.arm();                          // Send the Arm value
  myESC2.arm();                          // Send the Arm value
  myESC3.arm();                          // Send the Arm value
  myESC4.arm();                          // Send the Arm value
  digitalWrite(LED_PIN, HIGH);          // LED High Once Armed
  delay(5000);                          // Wait for a while
}

void loop() {
  val = analogRead(POT_PIN);            // reads the value of the potentiometer (value between 0 and 1023)
  val = map(val, 0, 1023, 1000, 2000);  // scale it to use it with the ESC (value between 1000 and 2000)
  myESC1.speed(val);                     // sets the ESC speed according to the scaled value
  myESC2.speed(val);                     // sets the ESC speed according to the scaled value
  myESC3.speed(val);                     // sets the ESC speed according to the scaled value
  myESC4.speed(val);                     // sets the ESC speed according to the scaled value
  delay(15);                            // Wait for a while
}

Hi, i found this library very useful.
Previously, i have been using it to control an ESC to control a DC brushed motor, the ESC is micro type and showed below:

See first image

It works perfectly fine with DC brushed motor and the ESC for brushed motor.

Later, I upgraded my setup to DC brushless motor for better performance. I am using this kind of ESC:

See second image

I try to calibrate it and then run Ramp example. It did ramp up, but then the behavior hugely dependent on the delay.
When i remove delay(10) inside the loops for ramp up and ramp down, the signal ramp to quickly to 2000, and the motor can’t keep up with it. It is like given 10 ms to increase to that speed, if time out, proceed with the signal of even higher PWM. At the end, when the signal is ramp to 2000ms, it stop, it doesn’t stay at that speed during the long delay…

What and how can I do so that it will maintains at that speed or PWM when delay or other code are running, unless i use esc.stop() to stop it completely?

Thanks in advance.

Hi @ooi

I’m not sure I understand your problems and questions here.

The ESC_Ramp example is build to ramp Up and Down and changing the 10ms delay will create issues.

If you need to have the motor stay at full speed, in that example, you have to change de delay between the two ramp section.
Here I added a comment aside the delay.

void loop() {
  for (oESC = SPEED_MIN; oESC <= SPEED_MAX; oESC += 1) {  // goes from 1000 microseconds to 2000 microseconds
    myESC.speed(oESC);                                    // tell ESC to go to the oESC speed value
    delay(10);                                            // waits 10ms for the ESC to reach speed
  }

  delay(1000);                                            // delay after reaching full speed (2000us) and starting to ramp down

  for (oESC = SPEED_MAX; oESC >= SPEED_MIN; oESC -= 1) {  // goes from 2000 microseconds to 1000 microseconds
    myESC.speed(oESC);                                    // tell ESC to go to the oESC speed value
    delay(10);                                            // waits 10ms for the ESC to reach speed  
   }
  delay(5000);                                            // Wait for a while before restart
}

Let me know…!

Hi @dialfonzo
Thanks for the quick reply.
However, my situation is like this. When i try to change the delay between ramp up and ramp down, the motor just stop for the microseconds mention inside delay, it doesn’t stay at that top speed during the delay, wondering what’s the issue. My ESC require a refresh rate of 50Hz, and since i know this RC_ESC library is based on Servo library and it should inherent the 50Hz refresh rate by default, or it isn’t?
Does delay affect the microseconds pulse that it send? Or should I do something to latch on the outputting of the oESC so that it continuously send like 2000ms pulse forever?
Hope that this explained my situation.

The delay which is present in a “for” section is the amount to time before the value get increased.
However in Arduino code delay() is a complete stop of the code.

I’m currently not setup to test an ESC but here is a code which do not use delay() but be careful since I didn’t test and I’ve used ChatGPT to produce the code.

I’ve ask ChatGPT to use millis() instead of delay() and include variable you can change for the Hold Time

https://docs.arduino.cc/language-reference/en/functions/time/millis/

/*
  ESC_Ramp_No_Delay
  A non-blocking version of the original ESC ramp sketch using millis().
  Smoothly ramps up and down between SPEED_MIN and SPEED_MAX.
  
  23 May 2025
  by Eric Nantel (adapted for millis by ChatGPT)
*/

#include "ESC.h"

#define LED_PIN    13
#define ESC_PIN     9

#define SPEED_MIN 1000
#define SPEED_MAX 2000
#define SPEED_STEP 1              // Amount to increase/decrease each step
#define STEP_INTERVAL 10         // Interval between each step in milliseconds
#define HOLD_TOP_TIME 1000       // Hold time at SPEED_MAX
#define HOLD_BOTTOM_TIME 5000    // Hold time at SPEED_MIN

ESC myESC(ESC_PIN, SPEED_MIN, SPEED_MAX, 500);

int currentSpeed = SPEED_MIN;
int direction = 1; // 1 = ramping up, -1 = ramping down

unsigned long lastStepTime = 0;
unsigned long holdStartTime = 0;
bool holding = false;

void setup() {
  pinMode(LED_PIN, OUTPUT);
  myESC.arm();
  digitalWrite(LED_PIN, HIGH);
  delay(5000); // Initial arm delay
}

void loop() {
  unsigned long currentTime = millis();

  if (holding) {
    if ((direction == -1 && currentTime - holdStartTime >= HOLD_BOTTOM_TIME) ||
        (direction == 1 && currentTime - holdStartTime >= HOLD_TOP_TIME)) {
      holding = false;
      direction *= -1;
    }
    return;
  }

  if (currentTime - lastStepTime >= STEP_INTERVAL) {
    lastStepTime = currentTime;
    currentSpeed += direction * SPEED_STEP;

    if (currentSpeed >= SPEED_MAX) {
      currentSpeed = SPEED_MAX;
      holdStartTime = currentTime;
      holding = true;
    } else if (currentSpeed <= SPEED_MIN) {
      currentSpeed = SPEED_MIN;
      holdStartTime = currentTime;
      holding = true;
    }

    myESC.speed(currentSpeed);
  }
}

This talk about RC speed controllers and the Arduino library was understandable and educational. The explanation of signal modulation and ESC calibration was really helpful to me it made many technical issues that I had previously missed clear. It’s interesting to note that I looked at a number of assistance sites after completing a university project that included embedded systems and real time control. It made me realize how important precise instructions are, whether you’re writing academically or programming a microcontroller. I discovered academic support platforms throughout my research period, which are very beneficial for specialized topics like write my nursing dissertation. It’s amazing how electronics related abilities like accuracy and organization apply as well to academic writing.