

Superb work!!
Keep the good work up!!!
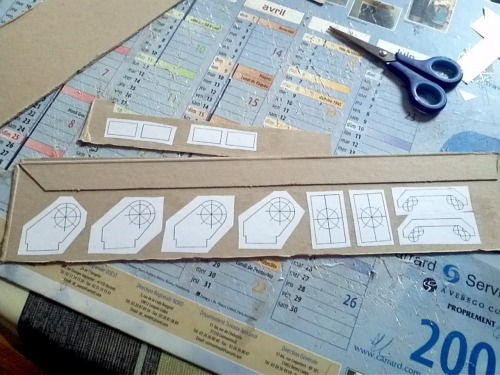
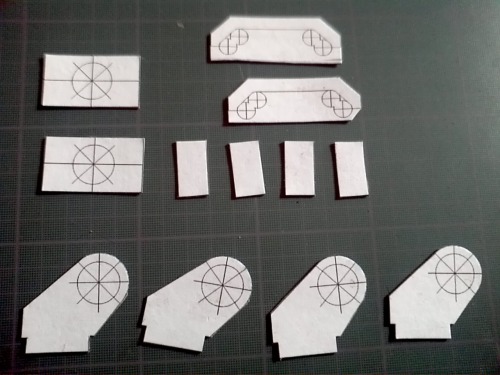
Another method I use is to
Another method I use is to just glue the printed template on the material with water solvent glue. Then you just cut and drill through it before sticking it in to some soapy water and wash the paper off. Then you get a part without any markings.
https://www.robotshop.com/letsmakerobots/node/16983
thats also a god idea 
thats also a god idea
I’ve used too.
Yes, I’ve used this another method too, in Godo’s first build. But in the toner transfer method I’ve got more precision in the cuts. I intend to give to the brackets some color later, that will eliminate the markings.
Thanks.
Thanks, man. I’ve really dedicate some “affection” to this work.
Ya
Ya, as it’s two surfaces of the same material, the adherence is more strong than I need, according to the mechanical strength tests that I’ve performed.
Excellent tip! Thanks!
I’ve always wondered whether a servo bracket could be made without special tools and material. I really appreciate this tip. Very well done.
Thank you very much!
Thank you very much!
Brilliant! I will use this
Brilliant! I will use this for my fourth robot arm 
materials
mine arrived this morning
the material is hard to cut with sharp blade
what software you use to do it?
what kind of material do you recommend?(see the list in portuguese)
---------------------------------------------------------
portugues
recebi o material hoje
o material parece dificil de cortar com estilete ,ainda nao fiz os moldes que quero
que software tu utilizas?
tenho a chapa de 2mm pelo link que tu indicaste (a do mercadolivre)
superbonder
estilete 18mm
furadeira artersanal 1mm
tesoura
lixa de construçao civil pra parede
ferro passar roupa
oque falta?
quero encaixar parafusos essa broca de 1mm é boa?
Hi, henrq!2mm sheet is not
Hi, henrq!
2mm sheet is not so hard to cut… After you made the initial cut, you can bend the part and break it, and this will facilitate the work.
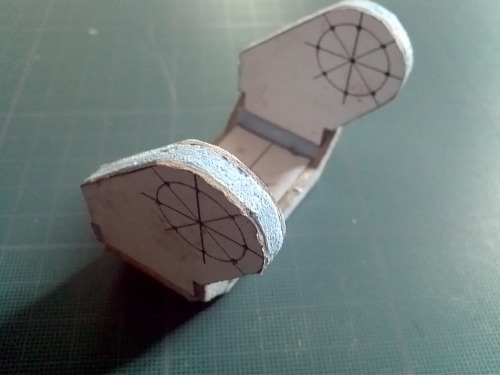
godo in cardboard made in ambroise
thank you dickel for your help
my work to day
so i arrive to build it some people can do it
it s very easy and don’t need a 3d printer so nice
amby
Nice work, ambroise!Sorry
Nice work, ambroise!
Sorry for not having advised you before, but this 45º bracket was made for micro servos (for example, Hitec HS-82MG and HS-5245MG). But if you want, I can adjust the drawings for your servo. Just tell me what is your model of servo.
godo robot
hello dickel
yes i start to build your godo
but i haven’t plans about hip?
for servos motor no prebleme
with my printer i can print more
thank you
Hi amby! I’m very curious to
Hi amby! I’m very curious to see your version of Godo! Please, show us! I’ve sent you the template of the hip.
my first cuti think it was
my first cut
i think it was hard/not easy
i only used the steel ruler and sharp blade
it isnt like yours,why?
---------------------
portuguese
primeiras peças
eu achei meio complicado
eu usei a regua e o estilete.
nao saiu “retinho” como o seu… porque?
Looking at your image seems
Looking at your image seems like the cut was done without following the line. You must “press” the blade to the ruler, passing through the same line few times.
-------------------------------------------------------------
PORTUGUESE:
Parece que o corte saiu da linha. Você deve pressionar o estilete contra a régua, com bastante firmeza (e muito cuidado com os dedos!), e a lâmina deve ser passada várias vezes sobre a mesma “linha”, evitando ao máximo que saia do curso. Depois que a lâmina abrir uma fenda com profundidade de aproximadamente metade da espessura da chapa, você poderá tentar dobrar no ponto onde foi cortado e a peça se “quebrará”, eliminando as partes indesejadas. Mas o que realmente dará uma boa aparência será o acabamento e retoques com lixa fina.
this is a great tutorial -
this is a great tutorial - especially for those of us without 3d-printers for servo bracket making. Thanks!
Thank you very much,
Thank you very much, osh!
Yep, much people still don’t have access to 3D printers. This is a low cost alternative, and you can get strong and nice looking parts.
EDIT: I’m not sure if you have seen this related post https://www.robotshop.com/letsmakerobots/node/42034 . It shows even more detailed my work.
I really loved your idea and appreciate it. Can you please resize the file for ( tower pro MG996 ) servo motor. I would be waiting for your reply.